PipeTuner Guide#
Introduction#
Pipelines for AI applications (e.g, intelligent video analytics) typically consist of a set of inference and processing modules, each of which typically has a distinct functionality implemented using corresponding logics and algorithms. Such logics and algorithms may have a number of parameters that determine the behavior and characteristics just like how the coefficients in a polynomial function shape the output of the function.
When you are trying to define and use a data processing pipeline for your application, such process typically entails a series of evaluations of the pipeline outputs in terms of a set of KPIs with a different set of parameters with respect to the expected outputs. Such a process of differing parameters is to get the best KPI from the pipeline, and it is typically carried out by a tedious manual iterative process in practice or a simple exhaustive/random search might be used, as shown in Figure 1:
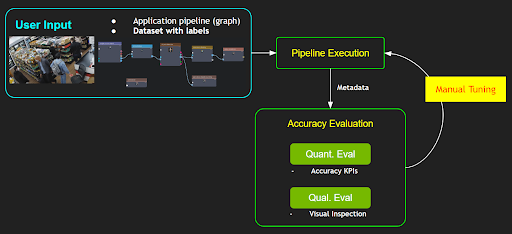
However, such a manual tuning process requires one to have in-depth knowledge on all the relevant data processing modules and their algorithms as well as how each parameter would affect the functionality. If the number of parameters is large in a pipeline, the complexity of the tuning would increase exponentially, and it would become a non-trivial task for ordinary users. In addition, tuning a pipeline for a particular use case or a dataset may negatively affect other use cases or a different dataset. Therefore, the tuning of a pipeline is an essential part of system deployment by users; yet it is one of the biggest challenges and pain points.
PipeTuner is a tool that efficiently explores the (potentially very high-dimensional) parameter space and automatically finds the optimal parameters for the pipelines, which yields the highest KPI on the dataset provided by the user. An important advantage of using PipeTuner is that the users are not required to have technical knowledge on the pipeline and its parameters. Therefore, PipeTuner can make the seemingly-daunting task of pipeline tuning more accessible to a wider range of users in terms of technical knowledge.
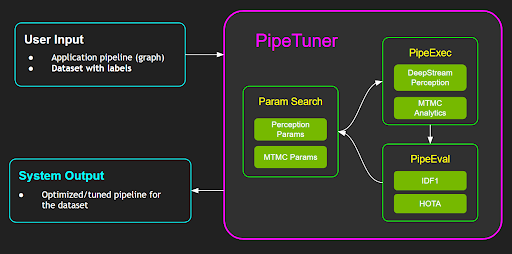
This document is a complete user guide for PipeTuner and walks users through easy-to-follow step-by-step instructions for tuning complete AI processing pipelines, including DeepStream-based perception pipelines and an end-to-end NVIDIA Metropolis multi-target multi-camera tracking pipeline, which is described in more details below:
DeepStream perception pipeline:
Typical DeepStream pipelines employ a detector (i.e., PGIE) and a multi-object tracker (MOT) to perform a perception task for each stream. PipeTuner allows users to optimize the detector and MOT parameters to achieve the highest-attainable perception accuracy KPI automatically based on the KPI metric and the dataset.
Metropolis Multi-Target Multi-Camera tracking (MTMC) pipeline
Metropolis MTMC consists of per-camera perception modules and a MTMC analytics module that aggregates the per-camera perception results to yield the global perception results across multiple cameras. The per-camera perception is carried out by DeepStream pipelines, and the perception results are fed to the MTMC analytics module. As the end-to-end MTMC pipeline consists into two parts, users are allowed to perform tuning only a part of the pipeline or the whole end-to-end pipeline as they wish.
To help users to better understand and set up the PipeTuner workflow, sample data and config files with different detectors and tracking algorithms are provided as a part of the release on NGC. Users then can customize their pipelines and datasets for their own use cases.
Terms |
Definition |
|---|---|
parameters |
A set of numerical values or discrete choices that determines the behavior of a software or algorithm in terms of accuracy and performance, typically defined in some configuration files, such as DeepStream or MTMC config files. |
pipeline |
A software that typically consists of multiple modules, each of which potentially has its own set of parameters, performs some processing given input data (e.g., video processing for perception or analytics). The output of a pipeline may include a set of metadata extracted from the input data, which can be evaluated qualitatively and quantitatively. |
accuracy metric |
An evaluation criteria or a method for getting a particular type of accuracy value, such as MOTA, IDF1 or HOTA. Those metrics are typically in the range of 0 and 1. |
optimizer |
An optimizing algorithm or library that is used to search globally optimal parameters in the defined parameter search space |
checkpoint |
A folder that stores the accuracy results and the corresponding parameters of an intermediate step during tuning. |
DS |
NVIDIA DeepStream SDK |
MOT |
Single camera multi-object tracking, requiring NVIDIA DeepStream SDK. The pipeline is DeepStream PGIE + Tracker. The output includes the metadata for target bounding boxes, IDs, frame numbers, etc. The same target is expected to have a unique ID persistently over frames in each camera/stream. |
MTMC |
Multi-target multi-camera tracking, requiring access to NVIDIA Metropolis Microservices. The pipeline consists of DS-based perception and MTMC analytics. The perception module for MTMC provides metadata for each target, including bounding boxes, IDs, and ReID embeddings. Then MTMC aggregates such metadata from multiple cameras and uses them to perform global target association and clustering over multiple cameras, and generates fused location data with globally-unique target IDs. |
Prerequisites#
PipeTuner supports both NVIDIA DeepStream SDK and Metropolis Microservices. The setup and usage have some differences listed below.
DeepStream users |
Metropolis Microservices users |
|
|---|---|---|
Which user group do I belong to? |
I only want to use DeepStream SDK |
I want to use Metropolis Microservices. I clicked “Download for Enterprise GPU” and applied for access |
Containers |
Users have access to DeepStream container |
Users have access to Metropolis Standalone Deployment package and mdx-perception container |
Use Cases |
Only DeepStream perception pipeline tuning is supported |
Both DeepStream perception and MTMC pipeline tuning are supported |
System Requirements#
PipeTuner requires the following components on an x86_64 system:
OS Ubuntu 22.04
NVIDIA driver 535.104 or 535.161
Docker - Setup instructions (need to run without sudo privilege - Instructions)
NVIDIA container toolkit - Setup instructions
NGC Setup#
Users need to follow below steps to sign in to an NGC account and get an API key.
Visit NGC sign in page, Enter your email address and click Next, or Create an Account.
Choose your organization when prompted for Organization/Team. DeepStream users may use any organization and team; Metropolis Microservice users need to select nv-mdx/mdx-v2-0; Click Sign In.
Generate an API key following the instructions.
Log in to the NGC docker registry (nvcr.io) and enter the following credentials:
$ docker login nvcr.io
Username: $oauthtoken
Password: "YOUR_NGC_API_KEY"
where
YOUR_NGC_API_KEYcorresponds to the key you generated from the previous step.
Metropolis Microservice users need to install NGC CLI following the instructions, and set ngc config as below. DeepStream users can skip this step.
$ ngc config set
Enter API key: "YOUR_NGC_API_KEY"
Enter org: nfgnkvuikvjm
Enter team: mdx-v2-0
Sample Data Setup#
The sample data consists of a mini-synthetic dataset with eight 1-minute streams and config files for tuning. You can download the sample files pipe-tuner-sample.zip from NGC web UI. Click three-dots under Actions, and click one option to download the file like below.
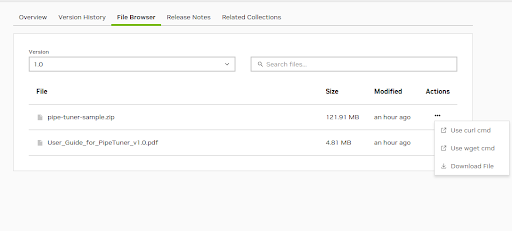
Once you download the sample file, unzip the file and run setup.sh to finish sample data for either DeepStream or Metropolis Microservices.
$ unzip pipe-tuner-sample.zip
$ cd pipe-tuner-sample/scripts

$ # DeepStream or Metropolis Microservices users should run only one of the following two commands based on their usage
$ bash setup.sh deepstream            # DeepStream users

$ bash setup.sh metropolis            # Metropolis Microservices users
DeepStream Tuning Case#
Once the set-up script is executed, the expected console output of DeepStream setup command would look like below:
$ bash setup.sh deepstream

Setup for PipeTuner and DeepStream SDK...
Pulling required containers...
1.0: Pulling from nvidia/pipetuner
Digest: sha256:17df032022cf1e94514f8625fadfff123e1ec3f297d8647bbd980cbd0683dfcf
Status: Downloaded image for nvcr.io/nvidia/pipetuner:1.0
nvcr.io/nvidia/pipetuner:1.0
[1/2] Pulled pipe-tuner image
7.0-triton-multiarch: Pulling from nvidia/deepstream
Digest: sha256:d94590278fb116176b54189c9740d3a3577f6ab71b875b68588dfc38947f657b
Status: Downloaded image for nvcr.io/nvidia/deepstream:7.0-triton-multiarch
nvcr.io/nvidia/deepstream:7.0-triton-multiarch
[2/2] Pulled deepstream image
Downloading NGC models...
--2024-04-19 16:12:11--  https://api.ngc.nvidia.com/v2/models/nvidia/tao/peoplenet/versions/deployable_quantized_v2.6.1/zip
Resolving api.ngc.nvidia.com (api.ngc.nvidia.com)... 34.209.247.55, 35.160.16.170
Connecting to api.ngc.nvidia.com (api.ngc.nvidia.com)|34.209.247.55|:443... connected.
HTTP request sent, awaiting response... 302 Found
…
Saving to: ‘../ngc_download//peoplenet_deployable_quantized.zip’

../ngc_download//peoplenet_deployable_ 100%[===========================================================================>]  85.05M  26.3MB/s    in 3.2s

2024-04-19 16:12:15 (26.3 MB/s) - ‘../ngc_download//peoplenet_deployable_quantized.zip’ saved [89182990/89182990]

Archive:  ../ngc_download//peoplenet_deployable_quantized.zip
 inflating: ../models/labels.txt
 inflating: ../models/resnet34_peoplenet.etlt
 inflating: ../models/resnet34_peoplenet.txt
--2024-04-19 16:12:15--  https://api.ngc.nvidia.com/v2/models/nvidia/tao/reidentificationnet/versions/deployable_v1.2/files/resnet50_market1501_aicity156.onnx
Resolving api.ngc.nvidia.com (api.ngc.nvidia.com)... 34.209.247.55, 35.160.16.170
Connecting to api.ngc.nvidia.com (api.ngc.nvidia.com)|34.209.247.55|:443... connected.
HTTP request sent, awaiting response... 302 Found
…
Saving to: ‘../models/resnet50_market1501_aicity156.onnx’

resnet50_market1501_aicity156.onnx     100%[===========================================================================>]  91.93M  29.0MB/s    in 3.2s

2024-04-19 16:12:20 (29.0 MB/s) - ‘../models/resnet50_market1501_aicity156.onnx’ saved [96398132/96398132]

Updating DeepStream Perception SV3DT configs...
Sample data setup is done
$ cd pipe-tuner-sample/scripts
DeepStream users should see docker images like below.
$ docker images
REPOSITORY                                              TAG
nvcr.io/nvidia/pipetuner                                1.0
nvcr.io/nvidia/deepstream                               7.0-triton-multiarc
Also, model files should be under the ‘models’ folder. They will be mapped into DeepStream containers during tuning.
$ ls ../models
labels.txt  resnet34_peoplenet.etlt  resnet34_peoplenet.txt  resnet50_market1501_aicity156.onnx
MTMC Tuning Case#
Once the setup script is executed like below:
$ bash setup.sh metropolis
Metropolis MTMC users should see docker images like below. The ‘models’ folder is empty because default models in mdx-perception container will be used.
$ docker images
REPOSITORY                                              TAG
nvcr.io/nvidia/pipetuner                                1.0
nvcr.io/nfgnkvuikvjm/mdx-v2-0/mdx-perception            2.1
The final directory under pipe-tuner-sample is like:
pipe-tuner-sample
├── configs
│   ├── config_CameraMatrix
│   ├── config_GuiTool
│   ├── config_MTMC
│   ├── config_PGIE
│   ├── config_PipeTuner
│   └── config_Tracker
├── data
│   ├── SDG_1min_utils
│   └── SDG_1min_videos
├── models
├── ngc_download
├── multi-camera-tracking (only for Metropolis Microservice)
└── scripts
Quick Start#
PipeTuner searches the optimal parameters by iterating the following three steps until the accuracy KPI converges or up to the max number of iterations (i.e., epochs) specified:
ParamSearch
Given the accuracy KPI score in the previous iteration, make an educated guess on the set of parameters that would yield a higher accuracy KPI. For the very first iteration, a random sampling in the parameter space would be conducted
PipeExec
Given the sampled/guessed parameter set, execute the pipeline with the params and generates metadata to allow accuracy evaluation
PipeEval
Given the metadata outputs from the pipeline and the dataset, perform the accuracy evaluation based on the accuracy metric and generates accuracy KPI score
The sample PipeTuner config files are included in pipe-tuner-sample/configs/config_PipeTuner to help users to get familiarized with the workflow, so that later they can come up with their custom pipeline with their own dataset.
Currently three different types of pipelines are supported for tuning:
DS-based Perception tuning
MTMC tuning with frozen perception
MTMC end-to-end (E2E) tuning
Users are allowed to choose to employ different neural net models in DeepStream for the first and the third use case, for example,
Object detector
ResNet34-based PeopleNet
Transformer-based PeopleNet
ReID model
ResNet50-based TAO ReID model
SWIN Transformer ReID model
The multi-object tracking (MOT) in DeepStream can use any of the tracker types in DeepStream, but for the MTMC perception, the NvDCF tracker is used as it has the highest accuracy and also it supports both camera image-based 2D tracking and Single-View 3D Tracking (more info can be found in the DeepStream documentation).
The instructions with the sample data and pipeline below section are designed to walk through the entire tuning process step-by-step.
Launch Tuning Process#
To run the sample pipelines, enter pipe-tuner-sample/scripts:
$ cd pipe-tuner-sample/scripts
Script launch.sh takes in a PipeTuner config file, automatically launches the containers and starts the tuning process. Usage:
$ bash launch.sh [deepstream or mdx-perception image name or id] [config_pipetuner.yml]
Users can choose to run one config file from below examples.
Note
Each sample pipeline can take 3 to 40 hours to finish depending on the model size and GPU type. To reduce the tuning turn-around time, users may choose to use smaller dataset or decrease the max number of iterations (i.e., “max_iteration” param in a PipeTuner config file in ../configs/config_PipeTuner/ folder) like in an example below. It’s currently set as “100”, but users can set it to 5 or 10 for quick experiments. Users can still keep it as 100 and stop it in the middle (how to stop the tuning process in the middle is explained later)
# black box optimization configs
bbo:
...
# different optimizers for tuning. Comment or uncomment to select different optimizers
# change max_iteration to set tuning iterations
optimizers:
  type1:
    name: "pysot"
    max_iteration: 100
DS Perception Tuning#
This use case optimizes DeepStream PGIE (i.e., object detection) and tracker parameters for perception accuracy. The pipeline for PipeExec step is constructed as:
(file source streams) → Decoder → PGIE → MOT→ (per-stream tracking results)
PipeEval step is then performed for MOT Eval to generate accuracy KPI scores.
To launch a pipeline with ResNet34-based PeopleNet model and NvDCF tracker with TAO ReID model, for example, run one of below commands based on your user group: For DeepStream users:
$ bash launch.sh nvcr.io/nvidia/deepstream:7.0-triton-multiarch ../configs/config_PipeTuner/SDG_sample_PeopleNet-ResNet34_NvDCF-ResNet50_MOT.yml
For Metropolis Microservices users:
$ bash launch.sh nvcr.io/nfgnkvuikvjm/mdx-v2-0/mdx-perception:2.1 ../configs/config_PipeTuner/SDG_sample_PeopleNet-ResNet34_NvDCF-ResNet50_MOT.yml # For Metropolis Microservices users
To launch a pipeline with Transformer-based PeopleNet model and NvDCF tracker with SWIN-based ReID model and SV3DT enabled, for example, run:
$ bash launch.sh  nvcr.io/nfgnkvuikvjm/mdx-v2-0/mdx-perception:2.1  ../configs/config_Pipecccccbldttjhbecjtvbvgrtdclfvtnetlifccucjnbuj
Tuner/SDG_sample_PeopleNet-Transformer_NvDCF-SWIN-3D_MOT.yml # For Metropolis Microservices users
MTMC Tuning with Frozen Perception#
This use case assumes the metadata from the DS perception pipeline (i.e., MOT results + ReID embeddings) are already generated and stored in JSON format. Only MTMC parameters are searched. The pipeline uses that as fixed input and searches for optimal MTMC parameters that would yield the highest MTMC accuracy. The pipeline for PipeExec step is:
(MOT results + ReID embeddings) → MTMC analytics → (MTMC results with global IDs)
To launch the pipeline, run:
$ bash launch.sh nvcr.io/nfgnkvuikvjm/mdx-v2-0/mdx-perception:2.1 ../configs/config_PipeTuner/SDG_sample_MTMC_only.yml
MTMC E2E Tuning#
This use case jointly optimizes DS perception (i.g., PGIE and tracker) and MTMC parameters for e2e MTMC accuracy tuning. This provides the highest flexibility for optimization, yet takes the longest time because of the pipeline complexity. The pipeline for PipeExec would look like:
(file source streams) → Decoder → PGIE → MOT→ (per-stream tracking results) → MTMC analytics → (MTMC results with global IDs)
To launch the e2e MTMC pipeline with DS perception module consisting of ResNet34-based PeopleNet model and NvDCF tracker with TAO ReID model, for example, run:
$ bash launch.sh nvcr.io/nfgnkvuikvjm/mdx-v2-0/mdx-perception:2.1 ../configs/config_PipeTuner/SDG_sample_PeopleNet-ResNet34_NvDCF-ResNet50_MTMC.yml
To launch the e2e MTMC pipeline with DS perception module consisting of Transformer-based PeopleNet model and NvDCF tracker with SWIN-based ReID model and SV3DT enabled, for example, run:
$ bash launch.sh nvcr.io/nfgnkvuikvjm/mdx-v2-0/mdx-perception:2.1 ../configs/config_PipeTuner/SDG_sample_PeopleNet-Transformer_NvDCF-SWIN-3D_MTMC.yml
Output#
After launching, pipeline outputs are saved in the below directory as an example.
pipe-tuner-sample
├── output
│   ├── log_client_2023-08-23_16-39-36
│   ├── log_server_2023-08-23_16-39-36
│   ├── <PipeTuner configname.yml>
│   └── <PipeTuner configname.yml>_output
│        ├── checkpoints
│        │   ├──DsAppRun_output_20230823_163959
│        │   ├──DsAppRun_output_20230823_164106
│        │   └──…
│        └── results
│            ├──configs_08-23-2023_16-39-57
│            └──<PipeTuner configname.yml>-2023-08-23_16-39-36_accuracy.csv
└──…
Explanation:
log_client_2023-08-23_16-39-36 and log_server_2023-08-23_16-39-36 are log files for the server and client inside the PipeTuner container.
<PipeTuner config name.yml> stores the automatically generated config files for the tuning
Each checkpoint folder (e.g. DsAppRun_output_20230823_163959) stores a checkpoint with tuned parameters and accuracy metric of that iteration. Also, the folder has the log file (log_DsAppRun.log) which contains the output of DeepStream app.
configs_08-23-2023_16-39-57 stores the automatically generated config files for pipeline components such as PGIE, tracker.
<PipeTuner config name.yml>-2023-08-23_16-39-36_accuracy.csv is a csv file that stores the accuracy metric and parameter values of all the iterations.
Here shows how the console output would look like:
Installing dependencies...
Installing dependencies (1/2)
Installing dependencies (2/2)
Launch BBO client...
Launch BBO server...
PipeTuner started successfully!

!!!!! To stop tuning process in the middle, press CTRL+C !!!!!

adding: DsAppServer (deflated 63%)
2024-03-19 08:09:52,108 root           INFO    seq_list: ['Retail_Synthetic_Cam01', 'Retail_Synthetic_Cam02', 'Retail_Synthetic_Cam03', 'Retail_Synthetic_Cam04', 'Retail_Synthetic_Cam05', 'Retail_Synthetic_Cam06', 'Retail_Synthetic_Cam07', 'Retail_Synthetic_Cam08']
2024-03-19 08:09:52,169 root           INFO    Writing configs to <path>/output/SDG_sample_PeopleNet-ResNet34_NvDCF-ResNet50_MOT_test.yml_output/results/configs_03-19-2024_08-09-52
2024-03-19 08:09:52,169 root           INFO    send backend init
2024-03-19 08:09:52,170 root           INFO    creating optimizers...
2024-03-19 08:09:52,170 root           INFO    done. created 2
 * Serving Flask app 'ds_bbo_frontend_server'
 * Debug mode: on
2024-03-19 08:09:52,186 root           INFO    init jobs done
2024-03-19 08:09:52,187 root           INFO    progress: 0% (0/4)
2024-03-19 08:09:52,193 root           INFO    wait backend ready
...
2024-03-19 08:12:15,232 root           INFO    progress: 25% (1/4) ETA 00:07:09
2024-03-19 08:12:25,447 root           INFO    progress: 25% (1/4) ETA 00:07:39
...
2024-03-19 08:13:47,190 root           INFO    progress: 50% (2/4) ETA 00:03:55
2024-03-19 08:13:57,413 root           INFO    progress: 75% (3/4) ETA 00:01:21
...
2024-03-19 08:14:58,719 root           INFO    progress: 100% (4/4) ETA 00:00:00
2024-03-19 08:14:58,720 root           INFO    OPTIMIZATION DONE!
…
stopping workers...
number of workers to stop: 2
number of workers to stop: 0
done.

!!!!! Press CTRL+C key to end PipeTuner !!!!!
Check what containers are running by:
$ docker ps


CONTAINER ID   IMAGE                                           COMMAND                 CREATED         STATUS          PORTS   NAMES
83b909fc0ddb   nvcr.io/nvidia/pipetuner:1.0    "/bin/bash"             44 minutes ago   Up 44 minutes          tuner_2024-01-17_21-44-58
41e514acf177   nvcr.io/nfgnkvuikvjm/mdx-v2-0/mdx-perception:2.1   "/opt/nvidia/nvidia_…"   44 minutes ago   Up 44 minutes              ds_2024-01-17_21-44-58
Note
TensorRT engine files are generated during the first iteration, so it may take 10 to 30 minutes longer than the next iterations.
Stop PipeTuner#
When the optimization ends, “!!!!! Press CTRL+C key to end PipeTuner !!!!!” is displayed on the console. PipeTuner can simply be stopped with pressing CTRL+C key. Pressing CTRL+C key stops the PipeTuner and the running docker containers. Also, the PipeTuner can be stopped with the keys in the middle of the optimization.The tuning results are still saved in the output directory. For example,
!!!!! Press CTRL+C key to end PipeTuner !!!!!

^C
Ctrl + C pressed!
Stopping containers...
tuner_2024-04-23_21-36-49
ds_2024-04-23_21-36-49
Containers stopped successfully

PipeTuner ends
(Optional) The launch.sh stops the docker images, but it doesn’t remove them. If users want to remove the The downloaded containers, they can simply be removed with command docker rm -f [container names].
$ docker rm -f tuner_2024-01-17_21-44-58 ds_2024-01-17_21-44-58
Retrieve and Visualize Tuning Results#
PipeTuner provides the following features to get the tuned parameters and results.
Plot accuracy convergence graph
Retrieve the optimal checkpoint
All the commands below are executed under pipe-tuner-sample/scripts
Usage: After launching tuning for a couple of iterations, run below command to retrieve the optimal results from checkpoints already generated:
$ bash result_analysis.sh <output folder> <metric>
Here <output folder> is the output directory created in “launch tuning process” step: pipe-tuner-sample/output/<PipeTuner configname.yml>_output, and <metric> should be the same as evaluation metric defined in PipeTuner config among MOTA, IDF1 and HOTA.
For example, to retrieve the result for SDG_sample_PeopleNet-ResNet34_NvDCF-ResNet50_MOT.yml, users can run the following command:
$ bash result_analysis.sh ../output/SDG_sample_PeopleNet-ResNet34_NvDCF-ResNet50_MOT.yml_output/ HOTA
Result analysis is saved in the below directory:
pipe-tuner-sample
├── output
│   ├── …
│   └── SDG_sample_PeopleNet-ResNet34_NvDCF-ResNet50_MOT.yml_output
│        ├── …
│        └── results
│            ├──accuracy_plot.png
│            └──DsAppRun_output_20230823_163959
└──…
Explanation:
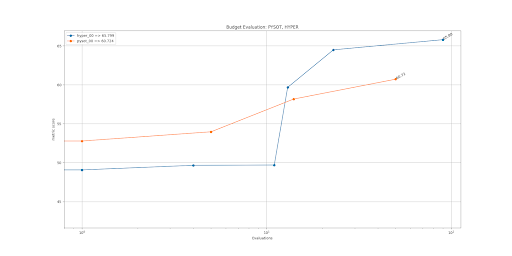
The copied checkpoint folder under pipe-tuner-sample/output/SDG_sample_PeopleNet-ResNet34_NvDCF-ResNet50_MOT.yml_output/results/ (e.g. DsAppRun_output_20230823_163959) is the optimal checkpoint with tuned PGIE, tracker, DeepStream configs and accuracy metric, which is good for deployment.
accuracy_plot.png is the accuracy metric vs iteration figure:
Console output:
storage: /media/sdb/pipe-tuner-sample
Result analysis command:
docker run --gpus all --rm -itd --net=host --name analysis_2023-08-23_16-53-39 -v /var/run/docker.sock:/var/run/docker.sock -v /media/sdb/pipe-tuner-sample:/media/sdb/pipe-tuner-sample nvcr.io/nvidia/pipetuner:1.0 /bin/bash -c "python3 /pipe-tuner/utils/plot_csv_results.py /media/sdb/pipe-tuner-sample/output/SDG_sample_PeopleNet-ResNet34_NvDCF-ResNet50_MOT.yml_output/results/*.csv /media/sdb/pipe-tuner-sample/output/SDG_sample_PeopleNet-ResNet34_NvDCF-ResNet50_MOT.yml_output/results/accuracy_plot.png; python3 /pipe-tuner/utils/retrieve_checkpoints.py /media/sdb/pipe-tuner-sample/output/SDG_sample_PeopleNet-ResNet34_NvDCF-ResNet50_MOT.yml_output HOTA;"
Found optimal HOTA: 44.942
Checkpoint path: /media/sdb/pipe-tuner-sample/output/SDG_sample_PeopleNet-ResNet34_NvDCF-ResNet50_MOT.yml_output/checkpoints/DsAppRun_output_20230823_163959
Optimal checkpoint copied to: /media/sdb/pipe-tuner-sample/output/SDG_sample_PeopleNet-ResNet34_NvDCF-ResNet50_MOT.yml_output/results/DsAppRun_output_20230823_163959
…
Custom Tuning#
This section describes how to customize the tuning process, including using new datasets, models and config files. Read the Understanding PipeTuner Config Path section to understand how paths are defined and mapped into docker containers.
Understanding PipeTuner Config Path#
<path>/pipe-tuner-sample/ is the only folder mapped from host to all the containers. All the tuning related files must be placed in this folder when customizing tuning. During runtime, rootPath in PipeTuner config is automatically overwritten by the sample data folder’s absolute path <path>/pipe-tuner-sample/. In PipeTuner config, all the other paths are the relative path to rootPath. For example, if seqmapPath is data/SDG_1min_utils/SDG_1min_all.txt, its absolute path is <path>/pipe-tuner-sample/data/SDG_1min_utils/SDG_1min_all.txt
parameter_space:
  Init:
    Exec:
      …
      rootPath: "overwritten as <path>/pipe-tuner-sample/ runtime"
      datasetPath: "data/SDG_1min_videos"
      seqmapPath: "data/SDG_1min_utils/SDG_1min_all.txt"
      …
In PGIE and tracker config, all the paths are absolute paths. They need to be manually updated to match the actual paths on the machine. Paths in other config files are automatically generated, so no need to change them.
Custom Dataset#
Steps to use customize dataset in PipeTuner are:
Create video files
Create ground truth labels
Launch PipeTuner with the new config file
Different use cases require different dataset files. Only need to generate the files for the desired use case. For example, if DS Perception Tuning is the use case, only need to follow “Create Video Files - DS Perception Tuning” and “Create Ground Truth Labels - DS Perception Tuning”.
Create Video Files#
DS Perception Tuning#
Add videos: Create a new video folder under pipe-tuner-sample/data. It should contain all the videos used for tuning. The videos need to have 1920x1080 resolution in mp4 format.
pipe-tuner-sample
data
<new dataset videos>
<video0.mp4>
<video1.mp4>
…
Create sequence map: Create a new utils folder under pipe-tuner-sample/data. Create a txt file <seqmap.txt> containing all the video names without “.mp4” extension
pipe-tuner-sample
data
<new dataset utils>
<seqmap.txt>
The content in <seqmap.txt> is below. The first line should always be “name”, and then each line is one video name. name <video0> <video1> …
Update PipeTuner Config: Change datasetPath, seqmapPath in PipeTuner config
SDG_sample_PeopleNet-ResNet34_NvDCF-ResNet50_MOT.ymlto match the path of the new tracker config.datasetPath: "data/<new dataset videos>/" seqmapPath: "data/<new dataset utils>/<seqmap.txt>"
MTMC Tuning with Frozen Perception#
Add videos: Not required. Create sequence map: The same as section “Create sequence map” in DS Perception Tuning. Update PipeTuner Config: Change seqmapPath in PipeTuner config SDG_sample_MTMC_only.yml to match the path of the new tracker config. seqmapPath: “data/<new dataset utils>/<seqmap.txt>”
MTMC E2E Tuning#
All the steps are the same as DS Perception Tuning except the PipeTuner config is in PipeTuner config SDG_sample_PeopleNet-ResNet34_NvDCF-ResNet50_MTMC.yml.
Create Ground Truth Labels#
DS Perception Tuning#
Create ground truth files in data/<new dataset videos>. For each video, create gt.txt and seqinfo.ini like below
pipe-tuner-sample
data
- <new dataset videos>

   - <video0>

     - seqinfo.ini
     - gt

        - gt.txt

   - <video1>

     - seqinfo.ini
     - gt

       - gt.txt

   - …
gt.txtis the DS perception ground truth label file in the MOT format, which isframe_num, object_id, left, top, width, height, included_for_eval, class_id, visibility_ratio
Example:
3,1,315,176,22,32,1,1,1
3,4,511,130,30,88,1,1,1
seqinfo.iniis the sequence information file. Its format is below. The first line must be [Sequence]. There can be multiple parameters, but only seqLength is actually needed.[Sequence] seqLength=<num of frames in the video> <other info>
The evaluation script automatically finds the above ground truth files in datasetPath, so no need to change PipeTuner config.
MTMC Tuning with Frozen Perception#
Add MTMC camera calibration file and MTMC ground truth file under pipe-tuner-sample/data/<new dataset utils>. MTMC ground truth file format is camera, id, frame, left, top, width, height, x_on_ground, y_on_ground
Run DeepStream perception pipeline to generate single camera tracking results with Re-ID features as MTMC input. The MTMC input is in JSON format and defined by Kafka schema. Place it under pipe-tuner-sample/data/<new dataset utils>. Change mtmcCalibrationPath, mtmcGroundTruthPath and mtmcPlaybackPath in PipeTuner config to match the path of the new tracker config. mtmcCalibrationPath: “data/<new dataset utils>/<calibration.json>” mtmcGroundTruthPath: “data/<new dataset utils>/<MTMC ground truth.txt>” mtmcPlaybackPath: “data/<new dataset utils>/<MTMC input.json>”
MTMC E2E Tuning#
Add MTMC camera calibration file and MTMC ground truth file under pipe-tuner-sample/data/<new dataset utils>. MTMC ground truth file format is camera, id, frame, left, top, width, height, x_on_ground, y_on_ground
Change mtmcCalibrationPath, mtmcGroundTruthPath in PipeTuner config to match the path of the new tracker config. mtmcCalibrationPath: “data/<new dataset utils>/<calibration.json>” mtmcGroundTruthPath: “data/<new dataset utils>/<MTMC ground truth.txt>”
Launch PipeTuner with the New Config File#
Review the PipeTuner config file to ensure all the paths are valid. The tuning workflow is the same as the sample dataset. Summary Below table summarizes the files to include in a new dataset. “v” means the specific files are required for that use case;
Dataset components |
Content format requirements |
File name requirements |
Path in the sample dataset |
PipeTuner config |
Single camera MOT tuning |
MTMC tuning with frozen perception |
MTMC E2E tuning |
|---|---|---|---|---|---|---|---|
Video files |
In mp4 format; All the videos have 1920x1080 resolution |
Videos must be stored under datasetPath folder. Video names must match sequence map. |
data/SDG_1min_videos/Retail_Synthetic_Cam01.mp4 data/SDG_1min_videos/Retail_Synthetic_Cam02.mp4 |
… |
datasetPath |
v |
v |
Sequence map |
Contains all the video names for tuning |
Any name is fine |
data/SDG_1min_utils/SDG_1min_all.txt |
seqmapPath |
v |
v |
v |
MOT ground truth |
MOT ground truth |
<datasetPath>/<video name>/gt/gt.txt |
data/SDG_1min_videos/Retail_Synthetic_Cam01/gt/gt.txt |
data/SDG_1min_videos/Retail_Synthetic_Cam02/gt/gt.txt |
… |
datasetPath |
v |
MOT sequence info |
Contains video information |
<datasetPath>/<video_name>/seqinfo.ini |
data/SDG_1min_videos/Retail_Synthetic_Cam01/seqinfo.ini |
datasetPath |
v |
… |
… |
MTMC camera calibration |
Camera calibration format defined by MDX team |
Any name is fine |
data/SDG_1min_utils/calibration.json |
mtmcCalibrationPath |
v |
v |
|
MTMC ground truth |
MTMC ground truth defined by MDX team |
Any name is fine |
data/SDG_1min_utils/ground_truth.txt |
mtmcGroundTruthPath |
v |
v |
|
MTMC sample input |
In JSON format; Messages follow kafka schema defined by MDX team |
Any name is fine |
data/SDG_1min_utils/mtmc_playback_sample.json |
mtmcPlaybackPath |
v |
Data Augmentation#
PipeTuner helps finding the optimal parameters for the dataset used. What if the dataset used for tuning may not be representative of the physical environment that the camera system would be deployed? If the tuned parameters are overfitted to the dataset while the dataset is not general enough, then these tuned parameters may not work well when actually deployed to the test environment.
To mitigate this issue, PipeTuner provides an additional tool, which augment the dataset by introducing artificial noises or occlusion, so that the tuned params are robust to those variations that may be present in the real test environment.
Currently the data augmentation tool has very simple occlusion-inducing capability only, but it can be extended to offer wider varieties in the future.
A sample usage of the data augmentation tool is illustrated in the following sections.
Video Generation#
To generate augmented videos, execute below command under pipe-tuner-sample/scripts:
$ bash create_aug_videos.sh <input video folder>
<input video folder>: a folder that contains videos to be used for data augmentation
Example:
$ bash create_aug_videos.sh ../data/SDG_1min_videos/
Augmented videos are saved in the below directory.
pipe-tuner-sample
data
SDG_1min_videos_augmented
Retail_Synthetic_Cam01.mp4
Retail_Synthetic_Cam02.mp4
…
Retail_Synthetic_Cam01/
Retail_Synthetic_Cam02/
Interpretation:
Retail_Synthetic_Cam<num>.mp4are generated augmented videos like below.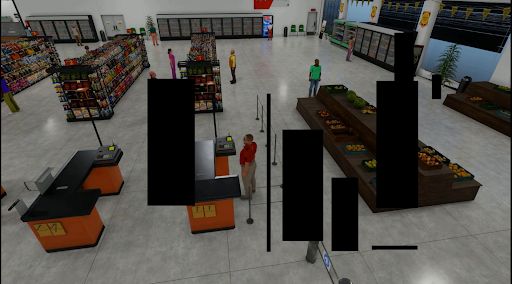
Folder
Retail_Synthetic_Cam<num>contains the single camera MOT labels, which are the same as the original dataset.Console output:
Launch command:
docker run --gpus all -it --rm --net=host --privileged -v /tmp/.X11-unix:/tmp/.X11-unix -e DISPLAY= -v /media/sdb/pipe-tuner-sample:/media/sdb/pipe-tuner-sample pipe-tuner:latest /bin/bash /pipe-tuner/utils/launch_augmenter.sh /media/sdb/pipe-tuner-sample/data/SDG_1min_videos
Augment /media/sdb/pipe-tuner-sample/data/SDG_1min_videos/Retail_Synthetic_Cam01.mp4 as /media/sdb/pipe-tuner-sample/data/SDG_1min_videos_augmented/Retail_Synthetic_Cam01.mp4
[VideoSource] Total # of frames = 1800
[VideoSource] Video frame rate = 30 fps
[FrameSourceUtil] Frame source type = VIDEO
OpenCV: FFMPEG: tag 0x34363248/'H264' is not supported with codec id 27 and format 'mp4 / MP4 (MPEG-4 Part 14)'
OpenCV: FFMPEG: fallback to use tag 0x31637661/'avc1'
Wrote 0 frames among 1800
Wrote 100 frames among 1800
…
Use in DS Perception Tuning#
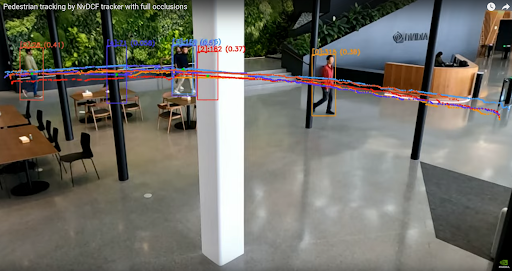
Tune DS perception parameters on the augmented dataset, and use the tuned config files on normal dataset without augmentation. Fewer ID switches and higher accuracy metrics are observed than tuning without augmentation.
To use an augmentation dataset for DS perception tuning, just change datasetPath in PipeTuner config to match the path of the augmented dataset.
What the figure below shows is that even if the original dataset does not have such large full-occlusion cases (i.e., the white vertical pole in the middle), if the pipeline is tuned with the augmented dataset with longer full occlusions, then the pipeline is tuned in such a way that the tracking can be done robustly even with the prolonged occlusions which were not present in the original dataset.
Custom Models#
The PGIE and Re-ID models used in sample configs are included in mdx-perception containers already. When using customized PGIE and Re-ID models in PipeTuner, they need to be added in pipe-tuner-sample/models directory on the host machine following the below steps.
Models on NGC#
Below PGIE and Re-ID models are used in sample configs, which can be downloaded from NGC.
Object detector (i.e., PGIE)
ResNet34-based PeopleNet
Transformer-based PeopleNet
ReID model
ResNet50-based TAO ReID model
SWIN Transformer ReID model
Object detector (i.e., PGIE)#
Steps to customize a PGIE model and use it in PipeTuner are:
Refer to how to customize a model in DeepStream. Place all the model resources under pipe-tuner-sample/models, such as label files, model files, model engine and customized libraries, etc.
pipe-tuner-sample
models
labels.txt
<ETLT file>
<ONNX file>
<engine file>
<Custom library if any>
…
Create a new PGIE config file as pipe-tuner-sample/configs/config_PGIE/<new PGIE config.txt>, make sure below parameters match the absolute path of the new model.
model-engine-file=<path>/pipe-tuner-sample/models/<engine file>
labelfile-path=<path>/pipe-tuner-sample/models/labels.txt
# for TAO model
tlt-encoded-model=<path>/pipe-tuner-sample/models/<ETLT file>
# for ONNX model
onnx-file=<path>/pipe-tuner-sample/models/<ONNX file>
Other parameters need changing based on the model architecture as well.
Change pgiePath in PipeTuner config to match the path of the new PGIE config.
pgiePath: "configs/config_PGIE/<new PGIE config.txt>"
Re-ID#
Steps to customize a Re-ID model and use it in PipeTuner are:
Refer to customizing a Re-ID model in DeepStream tracker. Place all the model resources under pipe-tuner-sample/models.
pipe-tuner-sample
models
<ETLT file>
<ONNX file>
<engine file>
…
Create a new tracker config file as pipe-tuner-sample/configs/config_Tracker/<new tracker config.yml>, make sure below parameters match the absolute path of the new model.
  # for TAO model
  tltEncodedModel: <path>/pipe-tuner-sample/models/Tracker/<ETLT file>
  # for ONNX model
  onnxFile: <path>/pipe-tuner-sample/models/Tracker/<ONNX file>
  modelEngineFile: <path>/pipe-tuner-sample/models/Tracker/<engine file>

Other parameters need changing based on the model architecture as well.
Change trackerPath in PipeTuner config to match the path of the new tracker config.
trackerPath: "configs/config_Tracker/<new Tracker config.yml>"
Custom Algorithms#
DeepStream and Metropolis provide multiple algorithms for DS perception and MTMC. Users can enable them by changing the corresponding config files.
Multi-Object Trackers#
Currently used DeepStream tracker is NvDCF_accuracy, but other algorithms such as NvDeepSORT or NvSORT can also be used. Place the new tracker config file as pipe-tuner-sample/configs/config_Tracker/<new tracker config.yml>, and change trackerPath in PipeTuner config to match the new path.
Single-View 3D Tracking#
Sample config_Tracker/config_tracker_NvDCF_accuracy_ResNet50_3D.yml and config_Tracker/config_tracker_NvDCF_accuracy_SWIN_3D.yml already provide examples for single camera 3D tracking. They use the pre-generated camera matrix configs in config_CameraMatrix directory. When switching to a new dataset, users need to:
Generate the new camera matrix configs following the steps in DeepStream document
Update cameraModelFilepath in tracker config with the absolute path of the new camera matrix configs
MTMC Analytics#
Currently used MTMC analytics algorithm config file is pipe-tuner-sample/configs/config_MTMC/config_mtmc_app.json. If some new MTMC config file is needed, place it as pipe-tuner-sample/configs/config_MTMC/<new MTMC config.yml>, and change mtmcPath in PipeTuner config to match the new path.
Customize Parameters#
Change Accuracy Metric#
Three accuracy metrics are supported for either single camera MOT or MTMC: MOTA, IDF1 and HOTA. It can be changed in PipeTuner config file as:
parameter_space:
  Init:
    …
    Eval:
      metric: 'HOTA' # accuracy metric across ['MOTA', 'IDF1', 'HOTA']
Parameter Search Space#
There are lots of parameters in PGIE, tracker and MTMC config files. The search space of each parameter is defined in PipeTuner config file as parameter_name: [ lower_bound, upper_bound (included), distribution, data_type ]. During each iteration, a value is generated in the search range and overwrites the original PGIE, tracker or MTMC config file provided.
Note
parameter_name must exist in the original config file. lower_bound, upper_bound must be within the feasible range of a parameter.
If a parameter appears in the original config file, but not in PipeTuner config, its value will be fixed as the original value.
Below is an example in PipeTuner config. Different use cases have different parameter search space. Feel free to add, change or remove the search space. More parameters and larger search ranges require more optimizers and longer iterations to run, but can give better results than small range.
parameter_space:
  Init:
    …
  NvDCF:
    BaseConfig:
        minDetectorConfidence: [ 0,0.9,linear,real ]
      StateEstimator:
        processNoiseVar4Loc: [ 1,10000,linear,real ]
      …
  PGIE:
      "[class-attrs-all]":
        nms-iou-threshold: [ 0.3,0.8,linear,real ]
      …
  MTMC:
    default:
        locationBboxBottomGapThresh: [0.01,0.05,linear,real ]
      …
Optimizers#
Five optimizers are supported: pysot, tpe, hyper, opentuner and scikit. Different optimizers generate different checkpoints, and the optimal checkpoint is selected from all the optimizers enabled. Uncomment below section in PipeTuner config to enable an optimizer (e.g. tpe). Typically 2 or 3 optimizers can give satisfying results. Change max_iteration to control the number of iterations for each optimizer.
bbo:
problem_type_is_min: false
job_batch_size: 1
optimizers:
  type1:
    name: "pysot"
    max_iteration: 100
    redundancy: 1
    batch_size: 1
#   type2:
#       name: "tpe"
#       max_iteration: 100
#       redundancy: 1
#       batch_size: 1
…
It is recommended that worker_number is set equal to the number of optimizers used.
servers:
 server1:
   …
   worker_number: 2
Optimization Manager Configs#
When a DeepStream application could fail to run with errors or output zero KPI score, then the optimization manager can capture the failures or zero scores. If there are too many failures or zero scores from DeepStream application, then the optimization process stops immediately. We can set the thresholds for the number of zero scores and failures.
threshold_zero_scores: if the number of zero scores from DeepStream application is higher than this parameter, then the process stops.
threshold_ds_app_fails: if the number of failures of DeepStream application is higher than this parameter, then the process stops.
# optimization manager configs
optim_manager:
  # threshold for the number of 0 scores
  threshold_zero_scores: 10
  # threshold for the number of DS app fails
  threshold_ds_app_fails: 3
Changelog#
Version 1.0#
Features#
Allow tuning of DeepStream-based perception pipeline
Allow tuning of end-to-end MTMC pipeline (i.e., DS-perception + MTMC-Analytics)
Output BBO client log messages to the console and the log file. Log levels are DEBUG, INFO, WARNING, and ERROR. All level messages are logged in the log file, whereas higher than INFO messages are displayed in the console.
Save DeepStream application’s log messages as a file (log_DsAppRun.log) under “checkpoints/DsAppRun_output__XXXX”
Check the DS app’s last log message is “App run failed”, then find and show the messages with Error, ERROR, and [Exception] in a console.
If the number of 0 scores from DS app is higher than a configurable parameter, then output error messages and stop all process
If the number of DS app fails is higher than a configurable parameter, then output error messages and stop all process